

We love shipping new features to our drivers and passengers at Cab9. However, given the scale at which Cab9 operates and the sheer number of variations we have to support which also includes personalising our Driver and Passenger apps for all our clients we realised that a manual deployment process won't scale as we grow.
Our existing manual processes relied heavily on individual developers to perform builds, test and release software to our users. To add to that, our project managers were often busy working on laborious and repetitive tasks related to distribution, documenting and testing. With most of these tasks happening on personal machines it also lacked transparency and hence we didn't have a lot of insights on our app releases.
It was time we employed a solution that would automate these processes for us. We looked at a number of existing systems and ultimately settled on using GitHub Actions starting with the next version of our Driver app.
Before getting into the details, let's understand the function of CI/CD pipeline and why we chose GitHub over other systems.
CI/CD which stands for continuous integration/continuous deployment defines a set of operating principles which enable software development teams to build and deliver code changes more frequently and reliably. It is a programming philosophy and not a technical specification. Developers today work on multiple platforms and across different environments. Working with an agile methodology makes it hard to predetermine when and how new updates should be integrated into existing systems. Continuous Integration is a way to automatically validate and integrate these code changes. Continuous Deployment picks up where CI ends, it's the process by which the final packaged software is deployed for public use, which often is a laborious and monotonous task. Cab9 which caters to a wide range of clients and platforms needed such a solution.
Initially we looked at Jenkins, a popular multipurpose automation software that has been widely used to build CI/CD pipelines. While it does a great job at automating most of the tasks in our app deployment process, it requires you to run a dedicated server, which is just introducing another point of failure. Also, to achieve anything we have to install a vast number of plugins. These plugins are often unmaintained and they introduce more bugs than they solve.
Another popular and mature CI/CD tool is Travis CI, while it can be directly integrated into GitHub and solves many Jenkins' problems, it still lacks the configurability that we were seeking.
Considering the aforementioned factors we decided to use GitHub actions. GitHub provides a simple way to build pipelines using its workflows, it allows tight integration with your source code directly and more importantly, you don't need to run a server. GitHub also has a huge marketplace of prebuilt tools which can be quickly used in our pipelines. GitHub provides its own compute time to run your pipelines and unlike Travis it includes a free plan.
Setting up a GitHub workflow
At its core GitHub enables you to build pipelines using 'workflows'. A workflow defines a set of 'actions' that are executed sequentially by default.
Creating a workflow is simple. Navigate to the "Actions" tab under your repository, click on "Setup a workflow yourself", this will create a YAML file under a directory .github/workflows in your repository with the name of your choosing. You can also create this file manually and push it to your repository.

Defining Triggers
GitHub workflows are event-driven, meaning a workflow is run when a specific event occurs with our repository. There can be a variety of events but the most commonly used events are:
- push - when commits are pushed to a repository
- pull_request - when a branch receives pull request
Workflows can also be triggered manually using a mechanism called "Workflow Dispatch"
Defining Jobs
A job is a set of steps that is executed within a workflow. A workflow can have multiple jobs. Conceptually a job should define a set of related steps. For example, if we want our workflow to build an application and run some tests, we'd define all the build steps in one job and all the testing steps in another. By default multiple jobs run in parallel, however they can be configured to run sequentially.
A Step is an individual task in a job that can either run shell commands or run an action. All steps within share the same context.
Using Actions
Actions are a specific type of step. You can create your own actions in separate YAML files or re-use existing ones that are available through an open source marketplace which is browsable through GitHub. Many of the functionality we might want to implement is most likely, already there so we can just directly use available actions in our workflow.
Actions are the building blocks of a GitHub pipeline.
The below code written in YAML represents a sample workflow. It defines a single job that is triggered when commits are pushed to the develop branch. It uses the action 'checkout' which is a widely used action to unpack code from our branch into our current job's working directory. The workflow also outputs the checked directory using a simple step that runs a shell command 'ls'
name: Sample Workflow

# Define Trigger
on:
	push:
    	branches:
        	- develop

jobs:
	sampleJob:
    	runs-on: ubuntu-latest #define the runner

        steps:
        	- name: Checkout
              uses: actions/checkout@v2

            - run: ls
Using a strategy matrix
Very often we might have a lot of similar tasks but with slightly different parameters. For example, we might have to run two different build tasks one for a production environment and the other for development environment. Writing two different jobs for these would be redundant and cumbersome. We can simplify this by making using of a strategy matrix. Using a matrix we can define all our variants and a single job definition. The workflow will then generate jobs for each variant which are then run in parallel. The name of the variant can then be used to make specific decisions in our job. Extending the above example, we can define a matrix for production and development as follows
name: Sample Workflow

# Define Trigger
on:
	push:
    	branches:
        	- develop

jobs:
	sampleJob:
    	runs-on: ubuntu-latest #define the runner

        #Define a matrix
        strategy:
      		matrix:
        		build_env: [prod, dev]

        steps:
        	- name: Checkout
              uses: actions/checkout@v2

            - run: ls
            - run: echo ${{matrix.build_env}} #access current matrix
Using workflow dispatch for manual triggers
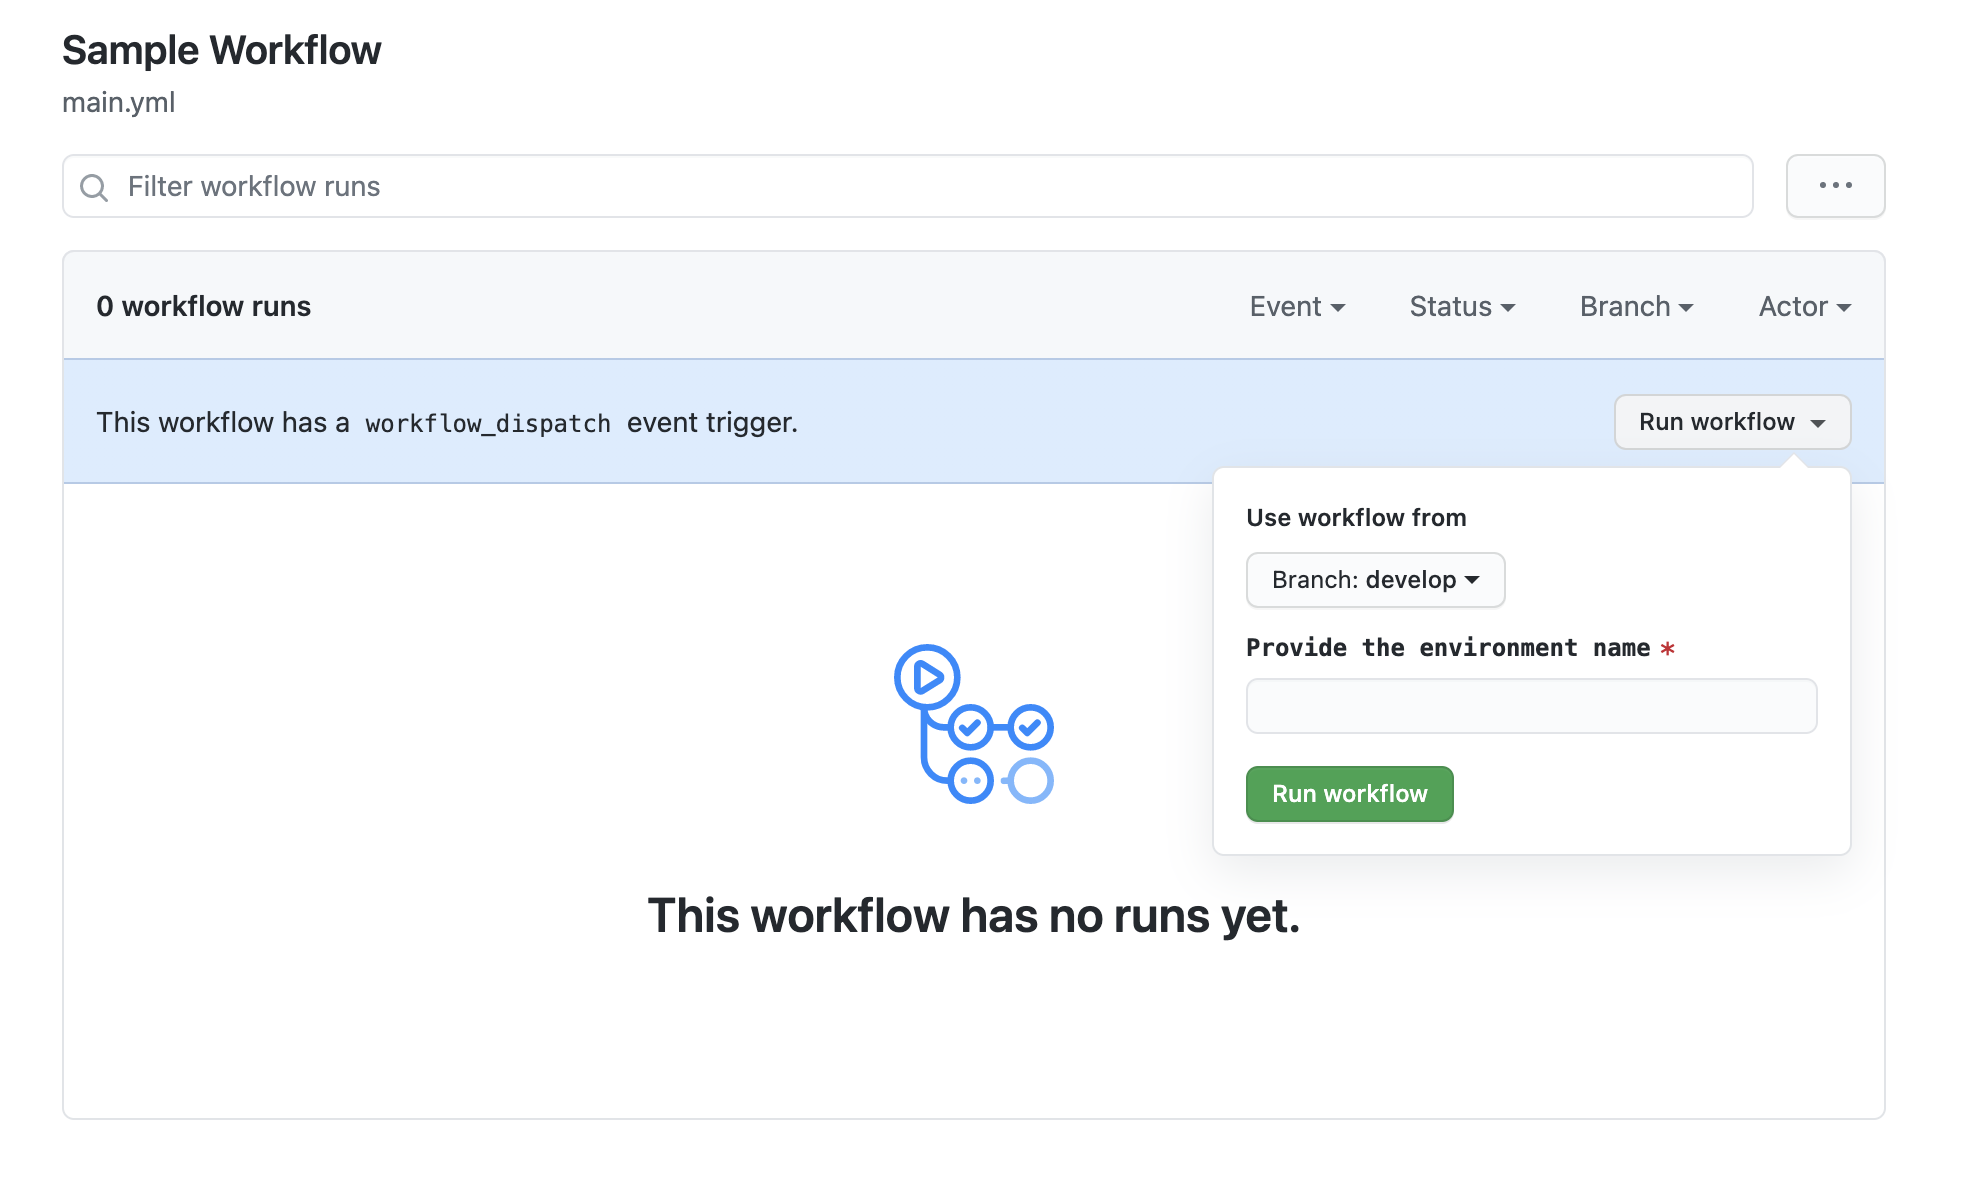
So far, we have seen that workflows can be triggered through events that occur on our GitHub repository. While this works great once we have tested our pipelines and they're ready for production, it is good to have the option to trigger workflows manually. Additionally we would like to pass on some input parameters that can be used in our workflows. We can do so with the help of workflow dispatch. These are manual events that can be invoked through the GitHub UI or through Github's REST API. Extending the above example, we can define a manual dispatch event as follows. The below workflow takes in an input called environment, which can be accessed across the workflow.
name: Sample Workflow

# Define workflow dispatch trigger
on:
	workflow_dispatch:
    	inputs:
      		environment:
        		required: true
        		description: 'Provide the environment name'

jobs:
	sampleJob:
    	runs-on: ubuntu-latest #define the runner

        #Define a matrix
        strategy:
      		matrix:
        		build_env: [prod, dev]

        steps:
        	- name: Checkout
              uses: actions/checkout@v2

            - run: ls
            - run: echo ${{ github.event.inputs.environment }} #access workflow dispatch inputs
Once defined, this workflow dispatch can be manually triggered under workflow's menu by clicking on Run Workflow
Bringing it all together for Cab9's Android Driver App
Once we had a clear overview of GitHub actions, we were able to define a workflow to manage the integration and delivery of Cab9's Android App.
To start with, our workflow had to achieve the following goals.
- Checkout the code whenever our develop branch is updated
- Setup a JDK environment.
- Generate debug and release variants using gradle
- Generate bundles (.aab) and package(.apk)
- Sign our release apk and bundle with our existing keystore
- Upload generated apks and bundles ( Artifacts ) to GitHub's storage
- Create a GitHub release with the signed artifact
Fortunately we didn't have to write any custom action to manage this pipeline. We were able to make use of existing actions on the GitHub marketplace. The actions we used were
actions/checkout@v2
Checks out code from repository branch
actions/setup-java@v1.4.3
Sets up java and JDK
eskatos/gradle-command-action@v1.3.3
Runs gradle commands, required to assemble our binary.
r0adkll/sign-android-release@v1.0.1
Signs android release files using keystore store as a GitHub secret
actions/upload-artifact@v2
Uploads generated artifacts to GitHub's storage for easy download
actions/create-release@v1
Creates a software release with source code, release notes and the final package
Defining the matrix and jobs
To generate a bundle (.aab) and package(.apk) and a debug and release version for each variant we define a 2x2 matrix. Additionally, our debug versions don't need to be signed, we can control this by providing a condition in our sign step.
Signing and Secrets
GitHub provides a safe way to store secrets such as keystores within the repository itself. These can be uploaded as base64 strings from the secrets menu in the repository settings.
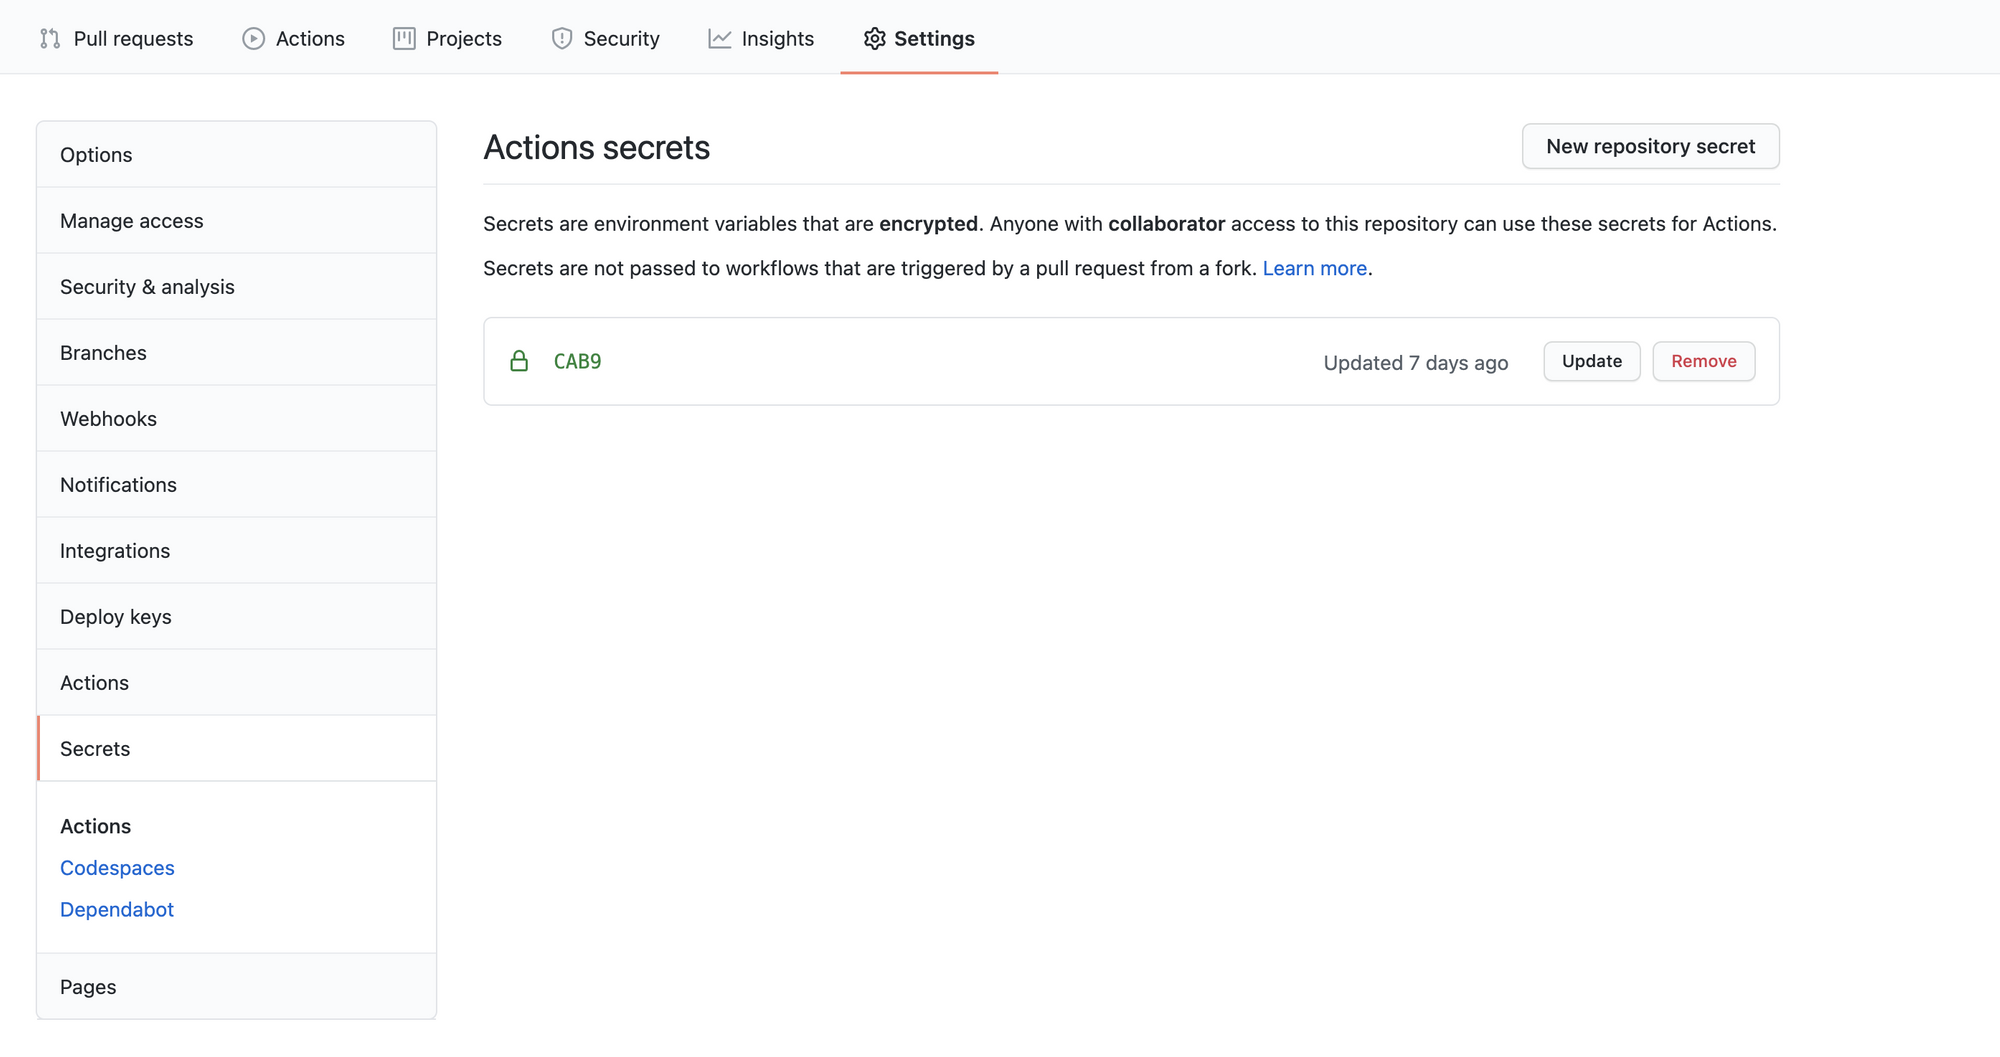
These secrets can be easily accessed in our workflows using the variable:
${{ secrets.CAB9 }}These secrets are encrypted on the client side and have a global scope, hence they can be used multiple workflows.
Final Pipeline Code
name: Build Cab9 Android

# Controls when the action will run.
on:
  push:
    branches:
      - develop

  pull_request:
    branches:
      - develop

jobs:
  build:
    runs-on: ubuntu-latest

    strategy:
      matrix:
        build_type: [Release, Debug]
        build_format: [assemble, bundle] # apk and aab

    steps:
      - name: Checkout
        uses: actions/checkout@v2

      - name: Setup JDK
        uses: actions/setup-java@v1.4.3
        with:
          java-version: 1.8

      - name: Build all artifacts
        id: builAllApks
        uses: eskatos/gradle-command-action@v1.3.3
        with:
          gradle-version: current
          wrapper-cache-enabled: true
          dependencies-cache-enabled: true
          configuration-cache-enabled: true
          arguments: ${{ matrix.build_format }}Cab9${{ matrix.build_type }}

      - name: Sign Artifacts
        id: signArtifact
        uses: r0adkll/sign-android-release@v1.0.1
        if: ${{ matrix.build_type == 'Release' }}
        with:
          releaseDirectory: app/build/outputs/apk/cab9/release
          alias: ${{ secrets.CAB9_ALIAS }}
          signingKeyBase64: ${{ secrets.CAB9 }}
          keyStorePassword: ${{ secrets.CAB9_KEYPASSWORD }}
          keyPassword: ${{ secrets.CAB9_KEYPASSWORD }}

      - name: Upload artifacts
        uses: actions/upload-artifact@v2
        with:
          name: Cab9-Generic
          path: |
              app/build/outputs/**/*.apk
              ${{steps.signArtifact.outputs.signedReleaseFile}}


      - name: Create Release
        id: create_release
        uses: actions/create-release@v1
        if: ${{ matrix.build_type == 'Release' }}
        env:
          GITHUB_TOKEN: ${{ secrets.GITHUB_TOKEN }}
        with:
          tag_name: ${{ github.ref }}
          release_name: Release ${{ github.ref }}
          draft: false
          prerelease: true

      - name: Save name of our Artifact
        id: set-result-artifact
        if: ${{ matrix.build_type == 'Release' }}
        run: |
          ARTIFACT_PATHNAME_APK=$(ls app/build/outputs/apk/cab9/release/*.apk | head -n 1)
          ARTIFACT_NAME_APK=$(basename $ARTIFACT_PATHNAME_APK)
          echo "ARTIFACT_NAME_APK is " ${ARTIFACT_NAME_APK}
          echo "ARTIFACT_PATHNAME_APK=${ARTIFACT_PATHNAME_APK}" >> $GITHUB_ENV
          echo "ARTIFACT_NAME_APK=${ARTIFACT_NAME_APK}" >> $GITHUB_ENV

      - name: Upload our Artifact Assets
        id: upload-release-asset
        uses: actions/upload-release-asset@v1
        if: ${{ matrix.build_type == 'Release' }}
        env:
          GITHUB_TOKEN: ${{ secrets.GITHUB_TOKEN }}
        with:
          upload_url: ${{ steps.create_release.outputs.upload_url }}
          asset_path: ${{ env.ARTIFACT_PATHNAME_APK }}
          asset_name: ${{ env.ARTIFACT_NAME_APK }}
          asset_content_type: application/zip
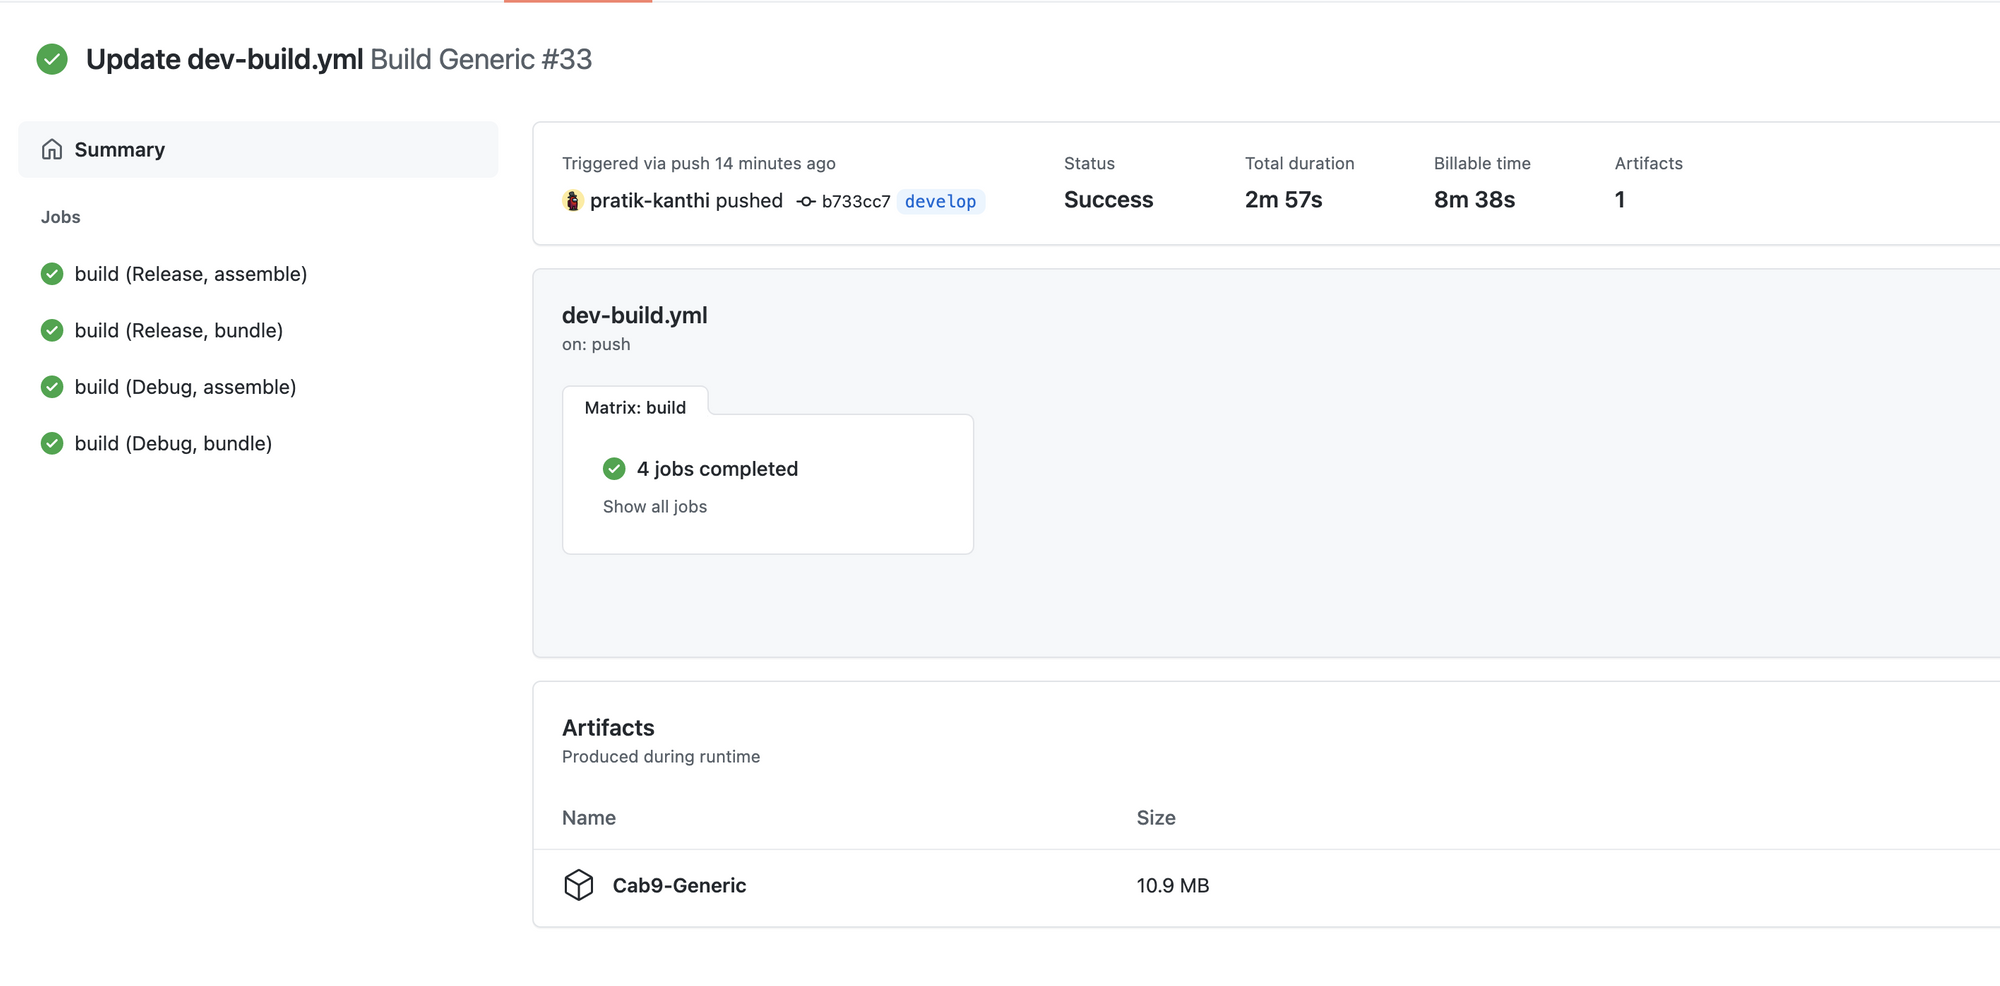
Build Results
Once a build is triggered, we can see the build logs by clicking on our workflow run through the actions menu.
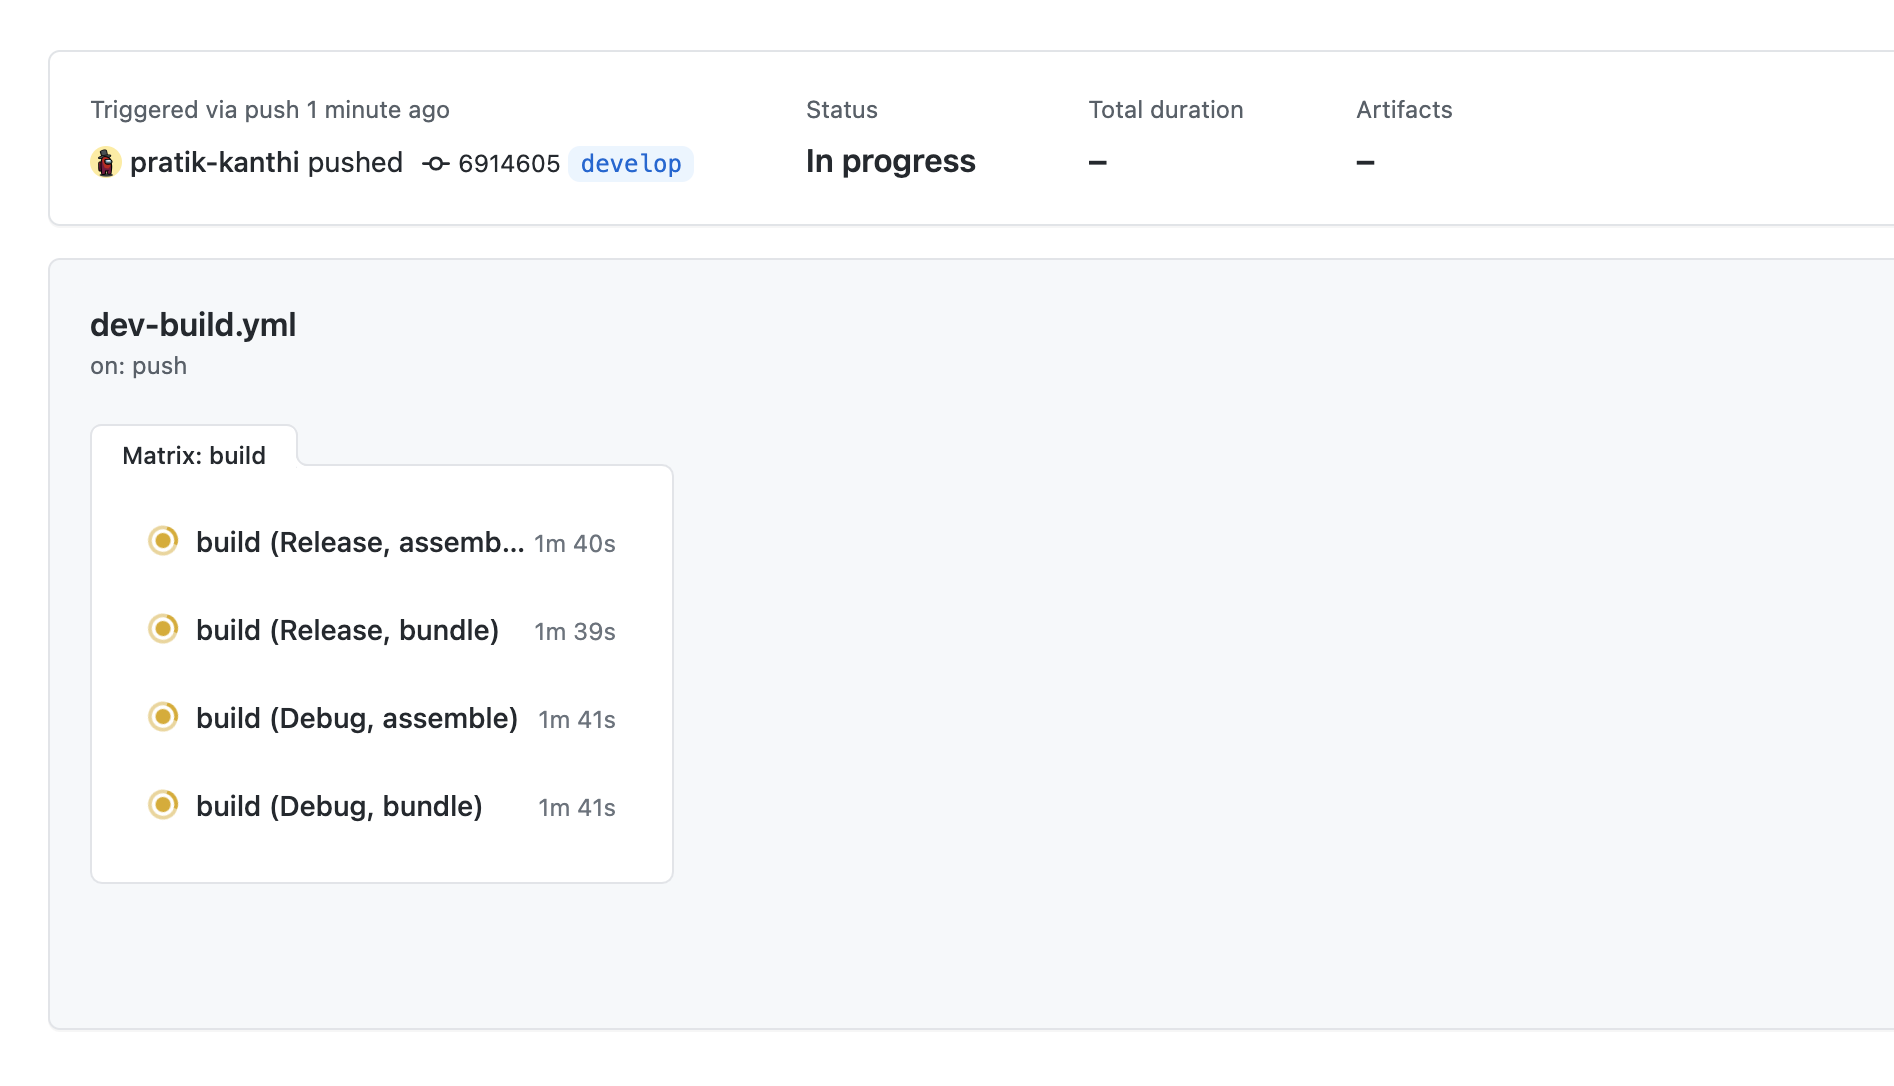
Here we can see four jobs running in parallel representing our matrix. We see detailed logs for each job as well.
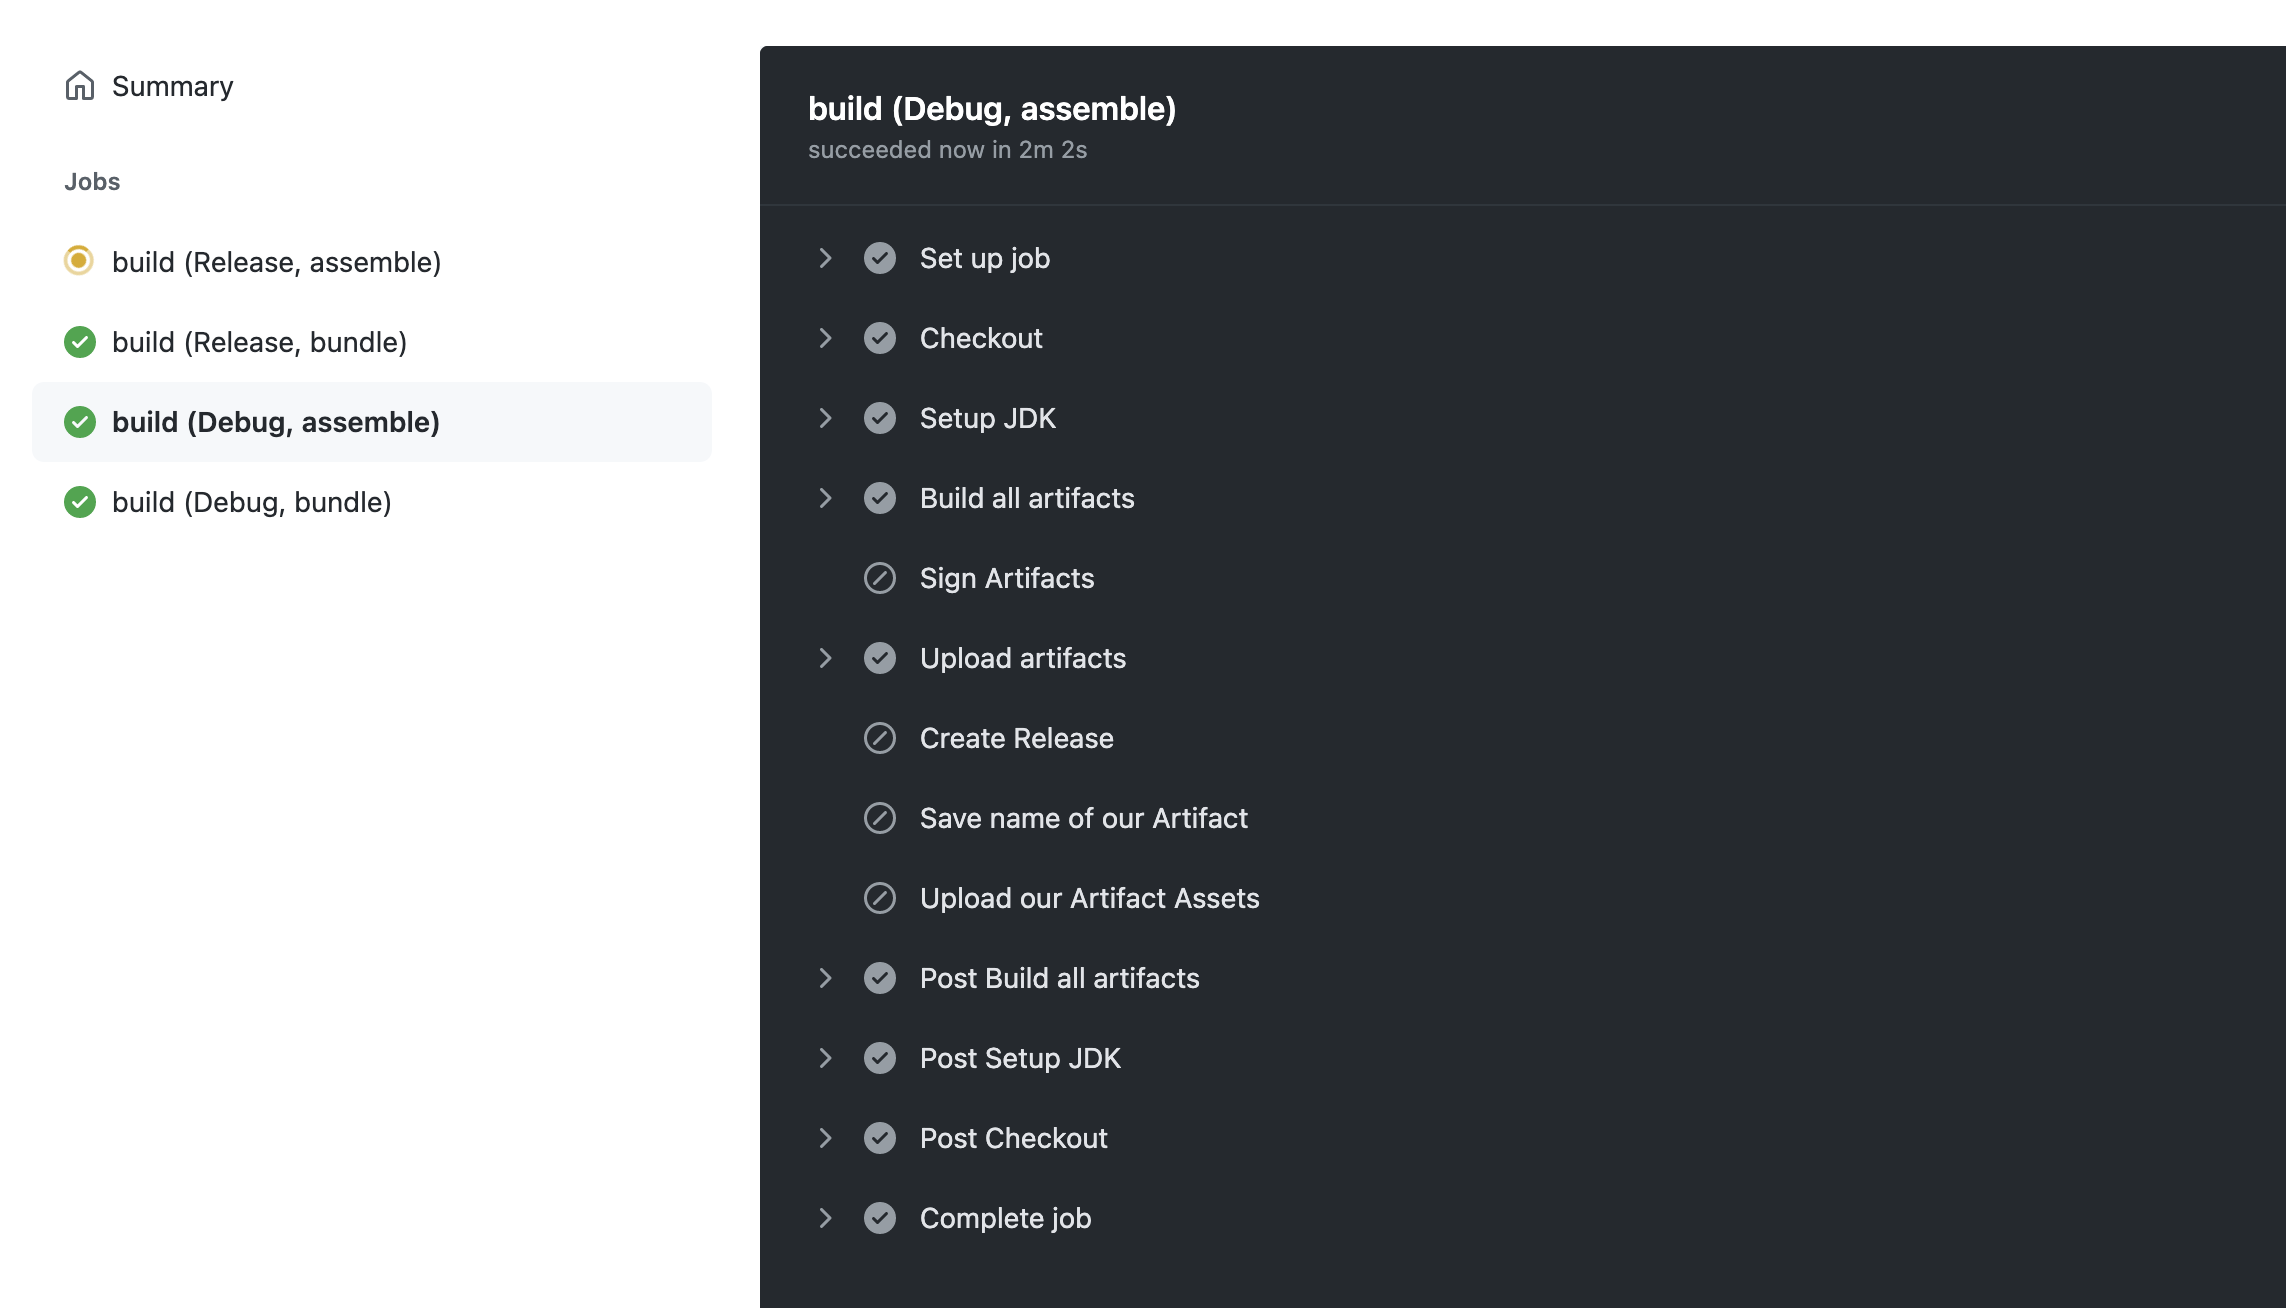
We can also see that the conditional steps have been skipped for our debug version.
Build Artifacts
As defined in our Step 5 of our job, we're saving the generated artifacts using the official GitHub action actions/upload-artifact@v2. Saving these generated artifacts is useful, firstly it provides as easy way to download the generated bundles and packages as a singe zipped file, secondly it serves as a historic record of the generated builds as each workflow run has its own artifacts. To access the uploaded artifacts, click on the workflow and find them at the bottom of the result screen.
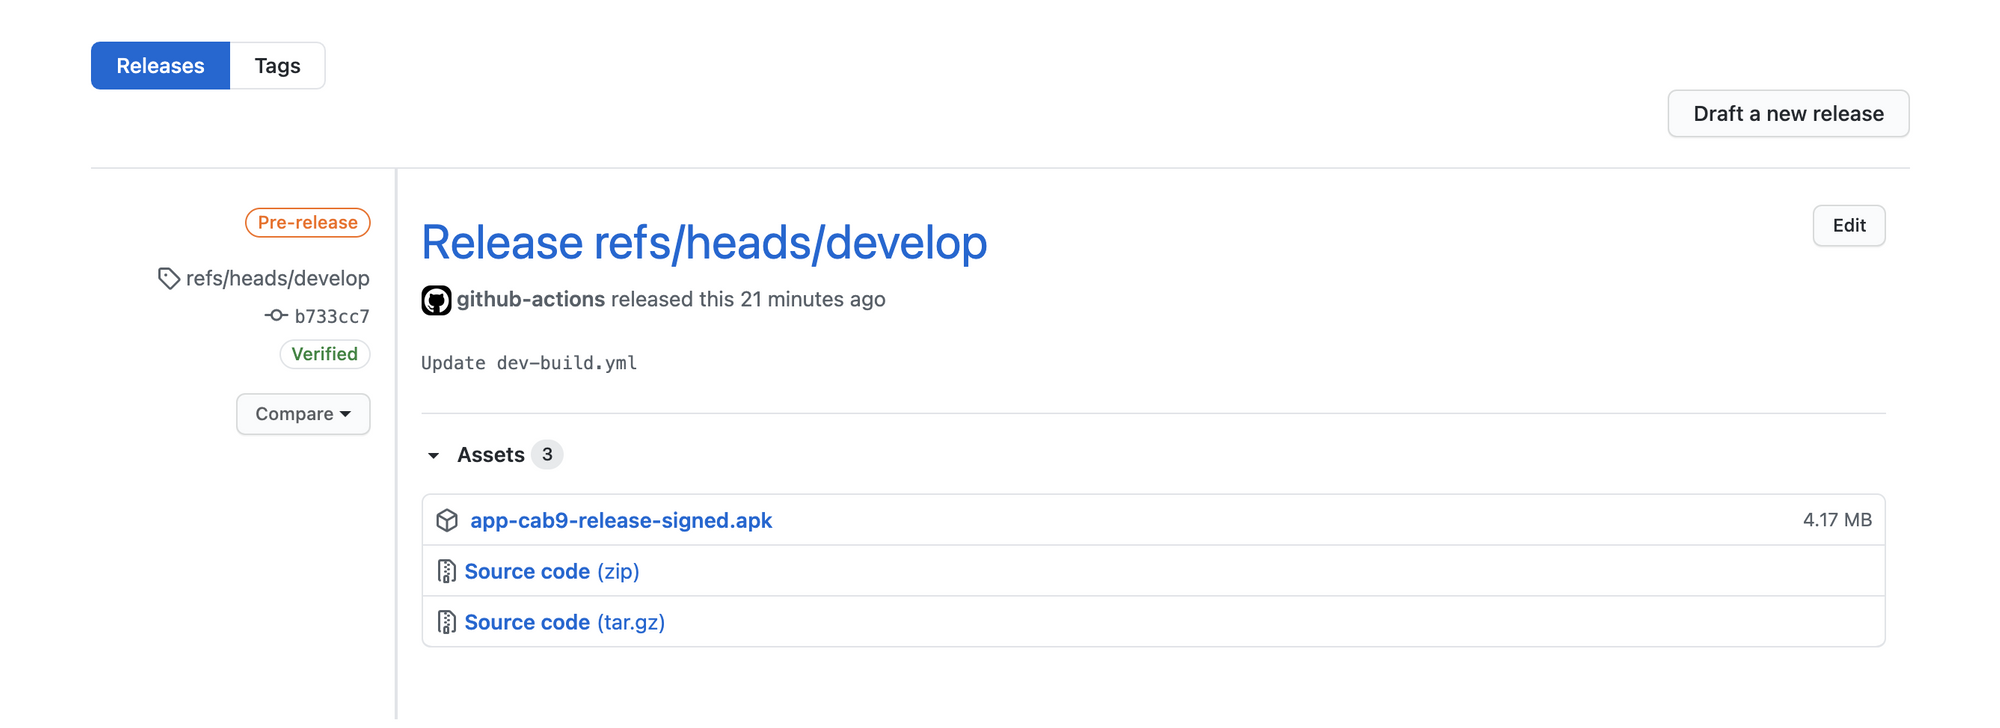
Creating Releases
While I've run the risk of losing your attention with the length of this post, the one last thing I'd like to talk about is about creating releases on github. Releases offer a convenient way of distributing software to your users. A release essentially is a point in time in your development cycle where the software is read to be distributed. The last two steps in our workflow is doing the work of creating a release. To put it briefly, it starts a release, writes any notes required and finally uploads the generated artifacts along with the source code at that point. A generated release can be accessed from the homepage of your repository. This post provides a good introduction to GitHub releases
In Conclusion
GitHub actions has vastly simplified and standardised the way we build and release our mobile apps at Cab9. Not only does it remove the dependancy on a single developer to follow the necessary practices, it moves the control over to the cloud thereby offering more transparency over our development cycles.
These are necessary steps required to build a scalable development team and GitHub actions is a great way to get started.